Shadowsocks, as an alternative to VPNs, has been quite popular in recent years, especially in countries such as China where VPN traffic constantly gets blocked or interrupted. Many people believe Shadowsocks is more stable and more reliable than VPN in those countries.
In this article, we will discuss how to set up and use Shadowsocks on Android devices.
Two Things You Need in Order to Use Shadowsocks on Android:
In order to use Shadowsocks on Android, you need to have two things ready:
First, you need to have a shadowsocks account that can be used to connect to a Shadowsocks server.
A Shadowsocks sever is basically a computer software installed on a remote computer that can handle your Shadowsocks traffic. The idea is similar to a web sever, on which you can host a website and people can visit the hosted website using its URL.
Instead of using a URL, most Shadowsocks server can be accessed using an IP address and a port number. Instead of being open to everybody who knows its address, a Shadowsocks server requires a passwords to access to it. In addition, since the Shadowsocks server will encrypt your web traffic and there are many ways to do encryption, you also need to specify the encryption method used by the Shadowsocks server. In summary, a Shadowsocks account usually includes: the Shadowsocks server’s IP address, the Shadowsocks server’s port number, the Shadowsocks server’s encryption method and a password.
Secondly, you need to have a Shadowsocks App installed on your Android device.
Having a Shadowsocks account is not enough. You also need to install a Shadowsocks App on your Android device to connect to the Shadowsocks server.
How to Get a Shadowsocks Account
Having a shadowsocks account means you have access to a Shadowsocks server. There are two ways to get access to a Shadowsocks server:
The Hard Way: Installing Your Own Shadowsocks Server
As a matter of fact, many Shadowsocks users (especially those in China where VPN traffic constantly gets blocked) are computer geeks and they prefer to set up their own Shadowsocks server so that they can have full control with a low cost (they only need to pay for the server hosting). If you want to try installing your own Shadowsocks servers, you can follow these two tutorials written by us:
How to Setup A Shadowsocks Server on Amazon EC2
How to Setup A Shadowsocks Server on DigitalOcean
The Easy Way: Buy or Ask for a Shadowsocks Account from Others
If you know somebody who has set up a Shadowsocks server by him/herself and is willing to share the server with you, you can ask for an Shadowsocks account from him/her.
Alternatively, there are some websites selling Shadowsocks accounts for a fee (some websites even offer free Shadowsocks account but I’d suggest be cautions for those offers). Unfortunately currently we haven’t found many reliable Shadowsocks sellers yet, so we can’t recommend a list of the best Shadowsocks providers to you. We know 12VPN has started offering Shadowsocks access with their VPN account. Maybe you can give it a try.
How to Install the Shadowsocks App on Android
The Shadowsocks android app we have been using is simply called Shadowsocks, written by Max Lv. You can find this app in the Google Play Store by searching for “shadowsocks” or by accessing its web interface from this link.
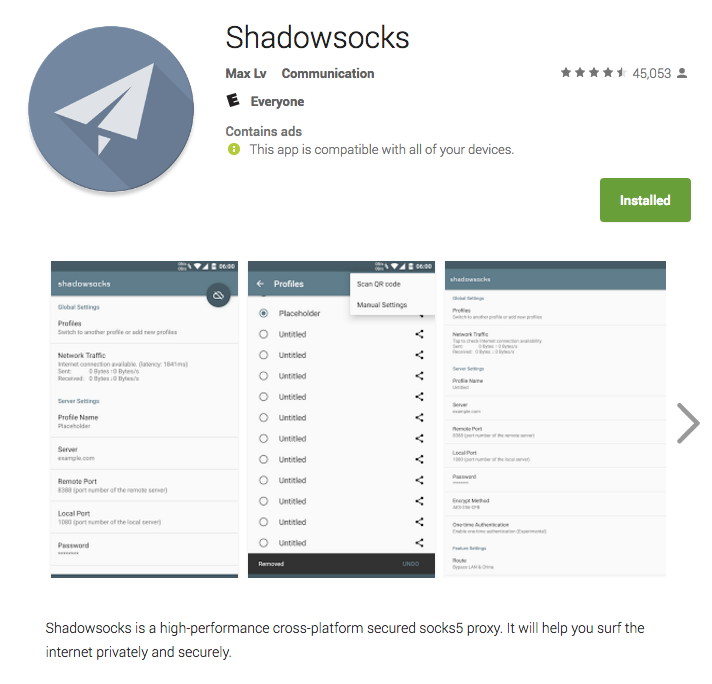
The nice thing about this Shadowsocks Android app is that it’s an open source software. Since everybody can look at the source code directly, it’s very unlikely there’s any malware, virus, backdoors or other bad stuff hidden in this app.
And there’s another big advantage of this app: it’s free!
If the Google Play Store is blocked in your location, you can download this app’s Android installation file (an .apk file) directly from this page. To do so, you can open this page using your Android device (Android phone or Android tablet) and click on the first link with an .apk extension to download it to your Android device.
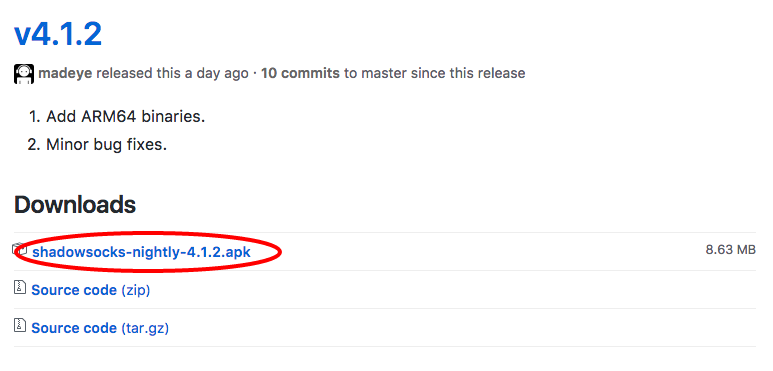
Please note that in order to install .apk files on your Android device, you might need to change your device’s security setting by checking the option for “Allow installation of apps from unknown sources”.
Then you can click on the downloaded .apk file to start installing this Shadowsocks Android app.
How to Configure the Shadowsocks Android App
Once you have the Shadowsocks app installed on your Android device, you then need to configure it by entering your Shadowsocks account info.
The Shadowsocks Android app allows you to set up multiple Shadowsocks accounts on it so that you can switch between different accounts for the best performance. Each account is called a “Profile”.
To add a new profile, tab the “Shadowsocks” dropdown menu from the top of the screen and you will see the profile page. You might see a “Default” profile listed there for you to edit and you can tab the big “+” button to add a new profile.
The Shadowsocks Android app provides a number of ways for you to add a new profile, including Manual Settings, San QR Code, NFC, Import From Clipboard etc.
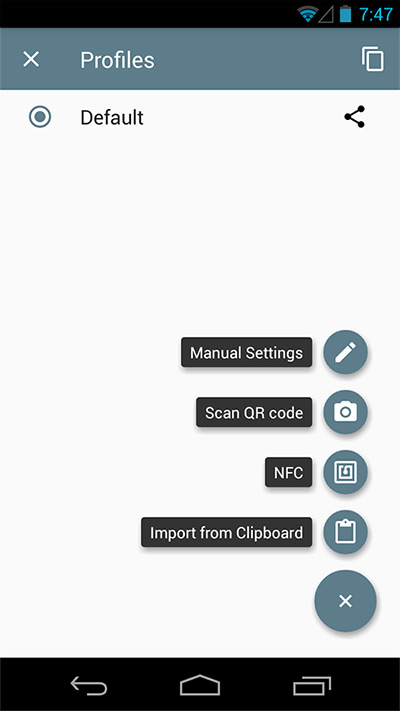
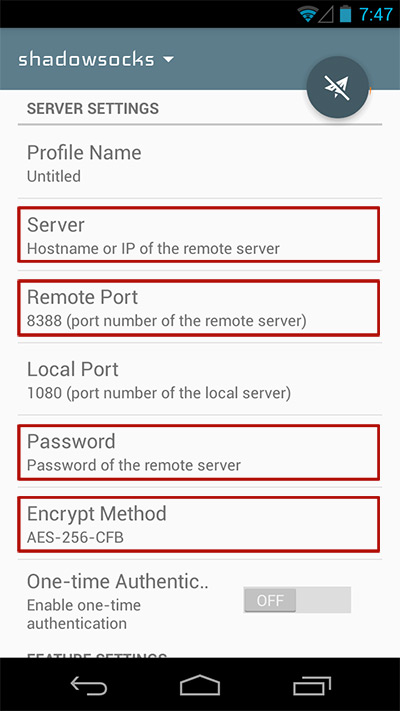
Let’s do a manual setup by tapping the “Manual Settings” icon. You will see a screen that looks like the picture below. I have highlighted the most important things that need to add/change. They are: 1) Server. 2) Remote Port. 3) Password. 4) Encryption Method. Use the login information you’ve obtained from your Shadowsocks provider to fill in these info. You can also give this profile a more meaningful name by changing its default name. The rest of the options you can leave unchanged.
How to Start the Shadowsocks Android App
Once you have finished configuration a profile, you can go to that profile and then tap on the paper plane icon to start Shadowsocks on your Android device. You might see a Android confirmation popup asking you to confirm you really want to do that, and you should go ahead and confirm. After your app has successfully contacted to the Shadowsocks server, the paper plane icon will turn green. And you will see a VPN connection icon showing up on the top bar of your Android device’s screen.
How to Stop the Shadowsocks Android App
To stop the Shadowsocks Android app, you can either open the app and click on the green paper plane icon to disconnect, or you can click on the VPN connection icon on the top bar on your Android device and then click Disconnect.
Tips for Using the Shadowsocks Android App
1. You Can Filter Out China Websites.
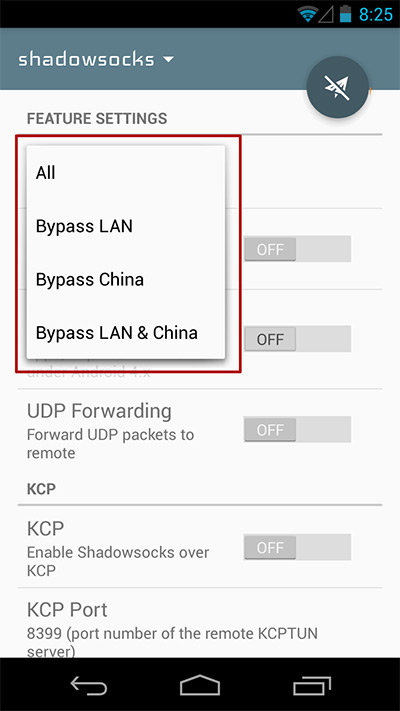
Many people use Shadowsocks in China to bypass Internet blocking. However, if all traffic go through Shadowsocks, then you will experience slower speed for China websites that are not blocked in China. Shadowsocks provides a nice feature to allow you to bypass China websites so that if you visit China sites such as Baidu and Taobao, the traffic doesn’t have to go through Shadowsocks. To turn on this feature, go to the profile screen and tab the “Route” option under “Feature Settings”, and then select “Bypass China” in the dropdown selections.
2. Turn Shadowsocks Off When You Don’t Need It
Although Shadowsocks is pretty good at hiding itself from the Great Firewall of China, the GFW is getting smarter every day and it might detect Shadowsocks traffic and then block you. Therefore, if you don’t need to visit blocked websites in China, I suggest you turn off Shadowsocks. Some people believe leaving Shadowsocks on all the time might increase your chance of getting caught by the GFW.
3. Choose a Shadowsocks Server Closer to You
If your Shadowsocks provider gives you a number of Shadowsocks servers to choose from, you should choose the one that has the shortest distance to your location to get the fastest speed. For example, if you are using Shadowsocks in Beijing, Japan might be the best choice. Also you can consider Hong Kong. If you need to connect to a U.S. server, choose one from the West Coast (San Francisco, Los Angeles etc.).
4. You Might Want to Have a Backup VPN
As the GFW is getting tougher, sometimes having a back-up solution is a good idea. If you want to have a VPN (maybe even a cheap VPN or a VPN with free trials) as a backup for Shadowsocks, you can consider the following VPN services that we have tested for working well in China: (Also see: 好用的VPN推荐)
| # | VPN | Rating | Link |
|---|---|---|---|
| No. 1 | 
|
ExpressVPN Review |
» Get ExpressVPN (3 month free) |
| No. 2 |  |
Surfshark VPN Review |
» Get Surfshark (with discount) |
| No. 3 |  |
NordVPN Review |
» Get NordVPN (with discount) |
| No. 4 |  |
PureVPN Review |
» Get PureVPN (with discount) |
| No. 5 |  |
VyprVPN Review |
» Get VyprVPN (with discount) |
